


Contemplating coverage?
Subscribe to receive our emails & get
$200 OFF!
Have questions?
Call us: (833) 544-8273

Expert-Reviewed Content: Guided by Editorial Standards

Written By Angel Vallejo
If your faucet is dripping, outdated, or simply beyond repair, knowing how to replace a faucet yourself can save you hundreds of dollars and give you a real sense of accomplishment. The good news? For most homeowners, a basic faucet swap is a manageable weekend project that requires only a handful of household tools and a couple of hours. That said, even straightforward DIY faucet replacement can run into unexpected hiccups, and knowing how to handle them is just as important as the installation itself.
At Liberty Home Guard, we believe every homeowner deserves the confidence to tackle home maintenance head-on. Whether you’re dealing with a leaky kitchen faucet or swapping out an old bathroom fixture, this guide walks you through every step of the process.

Before diving into DIY faucet replacement, gather the right tools and materials. Running back and forth to the hardware store mid-project is the fastest way to turn a one-hour job into a half-day ordeal.
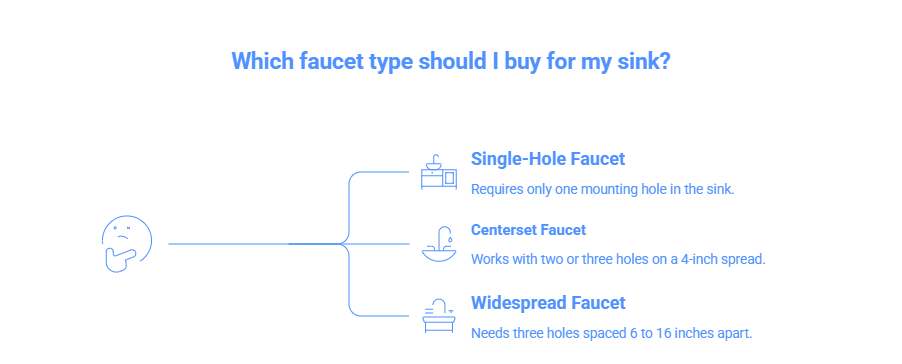
Pro tip: Before purchasing your new faucet, check the number of mounting holes in your sink. Most sinks have one, two, or three holes. Centerset faucets work with two- or three-hole configurations on a 4-inch spread, while widespread faucets need three holes spaced 6 to 16 inches apart. Single-hole faucets obviously need just one hole. Matching the right faucet type to your existing sink saves you from a frustrating return trip.
Locate the shut-off valves under the sink — one for hot, one for cold — and turn them clockwise until fully closed. Then open the faucet handles to release any water still sitting in the pipes. Place a bucket or towels beneath the work area; there’s almost always some residual water.
Using an adjustable wrench, loosen the supply line nuts where they connect to both the shut-off valve and the faucet body. Before disconnecting anything, snap a quick photo as a handy reference when reconnecting the new lines. Set the old supply lines aside; you’ll likely need new ones anyway.
With the supply lines disconnected, use your basin wrench to reach up into the tight space under the sink and loosen the mounting nuts holding the faucet in place. These nuts can sometimes be corroded or extremely tight. A penetrating oil like WD-40 can help. Once the nuts are off, lift the old faucet out from above. You may need a putty knife to break any old caulk or plumber’s putty seal.
Scrape away any old putty, caulk, or mineral buildup around the faucet holes using a putty knife and a mild cleaner. Mineral spirits can help dissolve stubborn silicone residue. A clean, smooth surface ensures your new faucet sits flush and creates a proper seal.
Follow the manufacturer’s instructions carefully because every faucet is a little different. In general, you’ll thread the supply lines and any mounting hardware down through the sink holes, then position the faucet from above. If your faucet requires plumber’s putty for sealing (some use a rubber gasket instead),apply it around the base before inserting. Tighten the mounting nuts from below using the basin wrench. Snug is good, but avoid over-tightening, which can crack the sink.
Attach the new supply lines and use Teflon tape on threaded connections for a better seal, connecting them to both the faucet and the shut-off valves. Slowly turn the shut-off valves back on, watching carefully for any drips. Turn on the faucet and let the water run for a minute, checking all connections underneath. Most modern faucets also have an aerator that should be removed and rinsed before first use to flush out installation debris.
Even the most careful DIY faucet replacement can hit a snag. Here are the most common faucet replacement issues homeowners encounter and practical solutions for each.
Years of moisture and mineral deposits can fuse mounting nuts in place. Apply a penetrating lubricant and let it sit for 15-20 minutes before trying again. If that doesn’t work, a strap wrench gives you extra leverage without scratching. In severe cases, you may need to cut the nuts off with a small hacksaw which is a tedious fix, but manageable.
If you spot drips after turning the water back on, don’t panic. First, turn off the supply valves and check whether the supply line connections are tight. A small leak at a threaded connection usually means you need Teflon tape or a bit more tightening. A leak from the faucet base typically means the mounting hardware isn’t fully secure or the putty/gasket isn’t seated properly.
This is one of the most common faucet replacement issues new installers run into. If pressure seems weak after install, start with the aerator which is almost always the culprit. Remove it, rinse out debris from the lines, and reinstall. Also double-check that your shut-off valves are fully open; a partially closed valve can dramatically reduce flow.
Faucets and valves don’t always share the same thread size or connector type. If your new supply lines don’t match, don’t force it—head back to the hardware store with the old line in hand for a proper match. This is also a good time to upgrade to braided stainless steel supply lines, which are more durable and resist bursting far better than plastic ones.
This is the one DIY faucet replacement scenario that escalates quickly. If your under-sink shut-off valve is stuck open, won’t seal, or starts leaking when you try to close it, you’ll need to shut off the main water supply to the house before proceeding. At that point, replacing the shut-off valve itself becomes necessary which is manageable for experienced DIYers but may be the moment to call in a licensed plumber.
DIY faucet replacement is a great skill to have, but there are times when it’s smarter to pick up the phone. Consider bringing in a professional if you encounter any of the following:
There’s no shame in knowing your limits. Catching a bigger plumbing issue early is always better and cheaper than a flooded bathroom discovered later.
Successfully completing a DIY faucet replacement is satisfying, but even the most handy homeowners can’t prevent every plumbing issue. Burst pipes, water heater failures, and major system breakdowns can happen without warning, and the repair costs can be significant.
That’s where Liberty Home Guard comes in. As a trusted partner for homeowners, we provide robust home warranty coverage designed to protect you when the unexpected happens. From plumbing and electrical systems to major appliances and HVAC, we’ve got you covered.
Explore our resources and coverage options at Liberty Home Guard to learn more about how a home warranty can give you peace of mind, and your wallet, a break. Whether you’re a first-time buyer or a seasoned homeowner, we’re here to help you protect your most valuable investment.
Protect What’s Most Important With
Get A Free Quote
America’s #1 Home Warranty
For most homeowners, a basic faucet replacement is a manageable weekend project that requires only a handful of household tools and a couple of hours.
Essential tools include a basin wrench for reaching tight spaces under the sink, an adjustable wrench or pliers, a bucket or towels to catch water, a putty knife or plastic scraper, and a flashlight or headlamp.
Check the number of mounting holes in your sink—centerset faucets work with two- or three-hole configurations on a 4-inch spread, widespread faucets need three holes spaced 6 to 16 inches apart, and single-hole faucets need just one hole.
Apply a penetrating lubricant and let it sit for 15-20 minutes before trying again; if that doesn't work, a strap wrench gives you extra leverage, or in severe cases you may need to cut the nuts off with a small hacksaw.
Low pressure after installation is usually caused by debris in the aerator—remove it, rinse out debris from the lines, and reinstall; also double-check that your shut-off valves are fully open.
Stay Ahead of Potential
Home Mishaps!
Subscribe to our Liberty Home Guard Newsletter and gain access to exclusive content that ensures your peace of mind.

Subscribe to receive our emails & get
Have questions?
Call us: (833) 544-8273
