


Contemplating coverage?
Subscribe to receive our emails & get
$300 OFF!
Have questions?
Call us: (833) 544-8273

Expert-Reviewed Content: Guided by Editorial Standards

Written By Angel Vallejo
That price tag on your new mirror, the shipping label stuck to a mason jar, the old parking permit baked onto your windshield: stickers on glass always seem easy to remove until you actually try. Peel too fast and you’re left with a gummy outline. Scrub too hard and you risk a scratch you’ll notice every time the light hits it.
removing sticker residue and adhesive from glass is easier than it looks once you work through the right methods in the right order. Start gentle, and only escalate to stronger tools if you need to. And always test any product on a small, hidden spot first, especially if your glass is tinted, coated, or has trim nearby, since some methods that are perfectly safe on a plain jar can damage treated surfaces.
A few household items will get you through almost every method below:
A few safety basics apply throughout: work in a ventilated space when using alcohol, nail polish remover, or commercial removers; keep solvents away from open flames or heat sources; never mix cleaning chemicals together; and test on an inconspicuous area first, particularly on tinted, coated, or painted surfaces near the glass.
If you’d rather skip ahead and just get stickers off glass fast, here’s where to start based on what you’re working on:
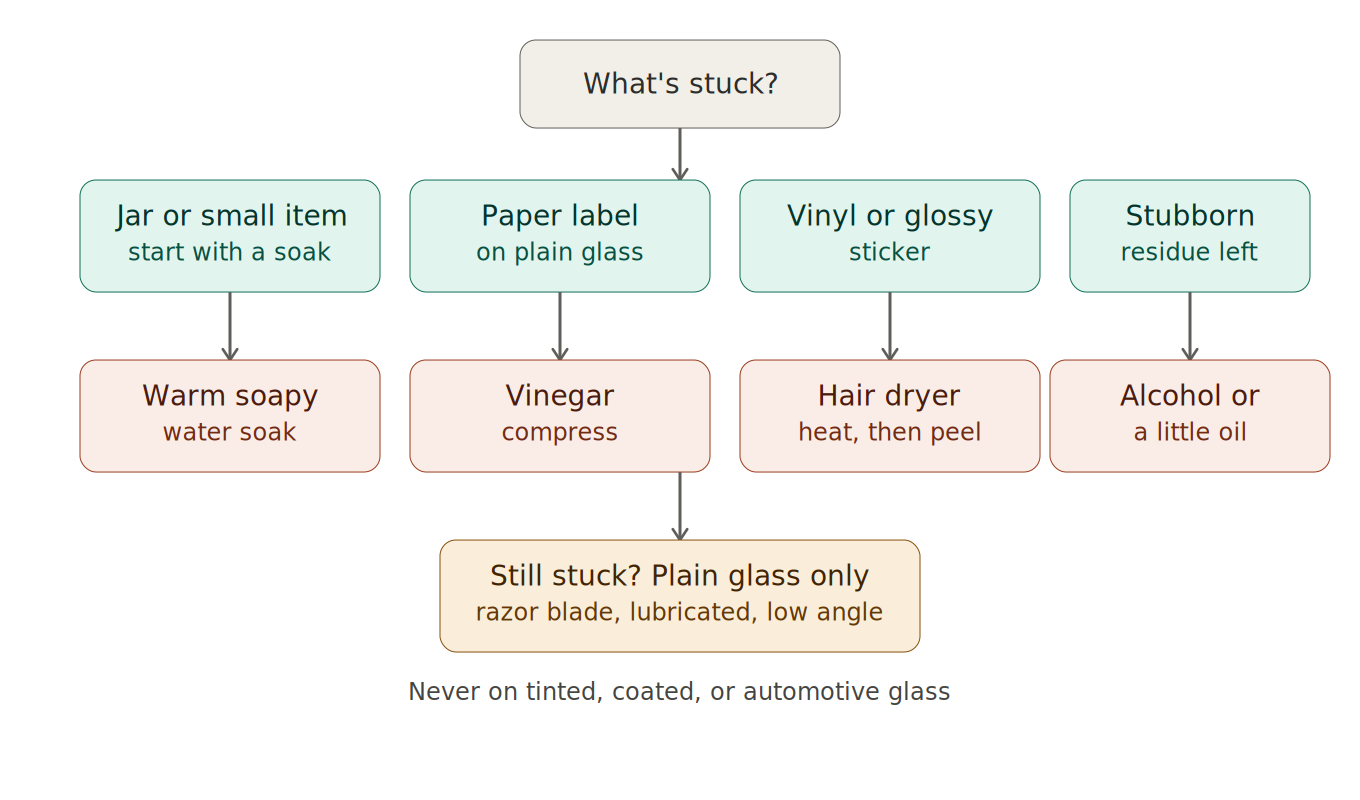
This is the easiest way to remove labels from glass jars and other small items. Fill a basin with hot water and a squeeze of dish soap, then submerge the item for several minutes to loosen the adhesive. Peel the label off, using a plastic scraper if any edges resist. Rinse and move on to the residue section if a sticky film remains. Adding a splash of white vinegar to the soak helps break down paper-based adhesives even faster.
Soak a cloth in white vinegar and lay it directly over the sticker or leftover residue for several minutes. The acidity softens the glue, making it easy to lift the sticker or rub away residue. Rinse with warm water and finish with a glass cleaner.
Set the dryer to high heat and hold it a few inches from the sticker. Warm it for 30 to 90 seconds, then peel slowly at a low angle while the adhesive is still soft. Work in sections, reheating as needed. Keep the dryer moving to avoid overheating one spot, and never use heat tools near flammable solvents.
Apply alcohol to a cloth and press it against the sticker or residue to let it soak in. Rub gently, repeating as needed for stubborn spots, then wipe with a damp cloth and finish with glass cleaner. Alcohol works well on many pressure-sensitive adhesives, so just make sure the room is ventilated while you work.
A small dab of vegetable, olive, or coconut oil can dissolve tarry or aged residue. Let it sit for a few minutes, rub with a cloth, and wipe away the loosened adhesive. Since oil leaves a greasy film, follow up with dish soap and warm water before a final glass-cleaner pass. Use only as much oil as you need; less makes cleanup easier.
Dab a cotton ball with non-acetone remover and press it onto the residue until it softens, then wipe clean. Wash with soapy water and finish with glass cleaner. Ventilate the area, and keep this product away from plastics, painted trim, tinted film, or coated glass, since it can damage those surfaces.
Products made specifically for adhesive removal can tackle tougher residue. Follow the label’s directions for application and wait time, then wipe and wash with soapy water before a final glass-cleaner finish. Check the label for flammability warnings and any cautions about painted surfaces or plastics before use.
Keep the glass wet with soapy water or vinegar so the scraper glides rather than drags. Work the edge under the label and push at a very low angle to avoid gouging the surface. Pairing this with heat or a soak first makes the job noticeably faster.
This is the strongest option, and it comes with real caveats. Wet the area with soapy water or glass cleaner to act as a lubricant, then hold the blade at a 30 to 45 degree angle and push gently in one direction, re-wetting frequently. Use only on uncoated, untinted plain glass: never on car glass with tint, defroster lines, or sensors, and never on glass with a factory coating. A fresh, sharp blade in a holder makes cleaner passes and protects your hands.
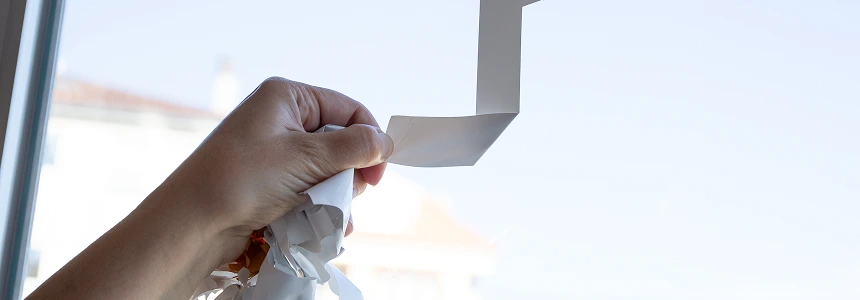
Once the sticker itself is gone, you may still have a gummy outline left behind. Rolling a leftover piece of the sticker into a small ball and using its own sticky side to dab up residue works surprisingly well. For gummier spots, alcohol usually finishes the job; for darker, tarry residue, a small amount of oil followed by a degreasing wash does the trick. Finish with a streak-free glass cleaner and a fresh microfiber cloth.
Windows and shower doors: Check manufacturer guidance before using strong solvents or blades, especially on coated or treated glass. Keep any liquid away from window seals, trim, or silicone caulk, which solvents can degrade over time.
Car windshields and windows: Avoid blades anywhere near tint, defroster lines, or sensors. Start with heat and a plastic scraper, and work slowly. If adhesive lingers near electronics or the edge of tinted film, stop and consult a professional rather than risk damage.
Old, dried-out adhesive is often the hardest to shift. Alternating heat and a solvent (like alcohol) helps break the bond from both directions. A longer dwell time with a vinegar compress or alcohol-soaked cloth can also help; sometimes 10 to 15 minutes makes a real difference. On plain glass, a careful razor scrape with lubrication is often the final step for residue that won’t budge any other way. If you’re left with a lingering haze, a dedicated glass cleaner and a fresh microfiber usually clears it.
Once the sticker and residue are gone, wipe the area with glass cleaner and a clean microfiber cloth, buffing dry in overlapping passes. Check your work in angled light, since it reveals streaks and haze that are invisible head-on, and spot-treat anything that remains.
Removing stickers and adhesive residue is routine cleaning, not a repair, so it isn’t something a home warranty plan covers. Liberty Home Guard does offer an optional Window Washing/Cleaning add-on for exterior window cleaning, but it doesn’t include sticker or adhesive removal, so it’s worth knowing the difference before you file a claim.
If you’re weighing coverage options, it helps to look at the full Total Home Guard plan lineup and the range of optional add-ons available, or review a sample policy and this guide to understanding your home warranty contract to see what’s actually covered. A home warranty is built to protect your budget against unexpected system and appliance breakdowns, with 24/7 claims support across three plan tiers, rather than day-to-day cleaning tasks like this one.
For guidance on choosing safer cleaning products and general safe-use practices around household chemicals, see the U.S. EPA Safer Choice program.
There’s a reason Liberty Home Guard was rated the #1 Home Warranty
Service by U.S. News and World Report for 2021, 2022, 2023, 2024, and 2026. Check out our services.
Alcohol, white vinegar, and commercial adhesive removers all work well as solvents, while oil is especially effective on gummy or tarry residue. Always test a small area first and work in a ventilated space.
Start with heat from a hair dryer and a plastic scraper rather than a blade. Avoid any tool near tint, sensors, or defroster lines, clean remaining residue with alcohol, and see a professional if you're unsure about coatings or tint near the sticker.
Yes, particularly on paper labels. Soak a cloth in white vinegar and hold it over the spot for several minutes, then scrape gently and finish with glass cleaner.
Lead with soaks, heat, and gentle solvents rather than scraping tools. When you do use a plastic scraper or card, keep the glass wet and the angle low to reduce friction.
Only on plain, uncoated, untinted glass, with plenty of lubrication and a shallow angle. Skip the blade entirely on tinted auto glass or coated windows; when in doubt, use a different method.
Soak the jar in hot, soapy water, then peel and scrape with a plastic tool. Treat any leftover residue with vinegar or alcohol, wash, and dry.
Stay Ahead of Potential
Home Mishaps!
Subscribe to our Liberty Home Guard Newsletter and gain access to exclusive content that ensures your peace of mind.

Subscribe to receive our emails & get
Have questions?
Call us: (833) 544-8273