


")

Contemplating coverage?
Subscribe to receive our emails & get
$200 OFF!
Have questions?
Call us: (833) 544-8273

Expert-Reviewed Content: Guided by Editorial Standards
¿Prefieres español? Lee este artículo en español
Most smoke detector problems can be fixed without replacement. Battery replacement resolves the majority of chirping issues. Cleaning removes false-alarm-causing dust. Wiring checks fix hardwired unit failures. Replacement is only necessary when the unit fails testing, has a sealed dead battery, or is 10 or more years old.
Here is a quick decision framework to guide you:
Situation | What to Do |
Chirping or beeping | Replace the battery (DIY) |
False alarms from dust or steam | Clean the unit, adjust placement (DIY) |
Hardwired unit chirping | Check wiring harness and circuit breaker (DIY) |
Tripped breaker powering the detector | Reset the breaker (DIY) |
Wiring is loose, damaged, or needs replacement | Call a licensed electrician |
Adding a new hardwired unit where no wiring exists | Call a licensed electrician |
Converting battery-only to hardwired | Call a licensed electrician |
Unit fails monthly test after new battery | Replace the unit |
Unit is more than 10 years from manufacture date | Replace the unit |
Sealed battery is dead | Replace the unit |
Physical damage (cracked housing, burned components) | Replace the unit |
Making sure your home has a home fire safety plan goes hand in hand with keeping your detectors functioning. This guide walks through every common smoke detector repair scenario so you can make the right call.
Symptom | Fix |
Chirping every 30 seconds | Replace the battery |
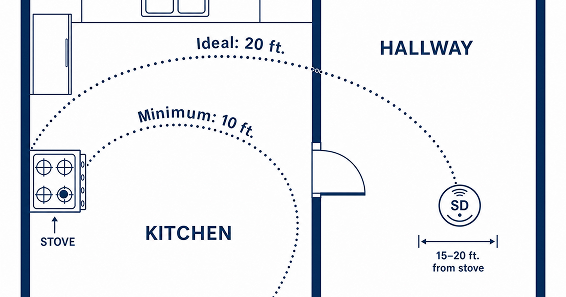
False alarms while cooking | Press hush button; improve ventilation; relocate detector if within 10 feet of stove |
No response when tested | Replace battery and retest; if still silent, replace the unit |
All alarms going off at once | Identify the initiating unit (fastest blinking red light); check for dust, steam, or dying battery |
No indicator light at all | Check battery, check hardwired connection, check circuit breaker |
Smoke detector shows yellow or amber light | Indicates fault or low battery; consult manual; may require unit replacement |
Hardwired detector beeping after power restored | Press and hold reset button 15 to 30 seconds; replace backup battery if needed |
Smoke detector fails monthly test | Replace battery and retest; if it still fails, replace the unit immediately |
Modern smoke detectors use two types of sensors. Ionization sensors detect tiny invisible particles produced by fast-flaming fires. Photoelectric sensors detect larger particles from slow-smoldering fires. Both types can chirp for the same handful of reasons. Here is how to diagnose and fix each one.
The most common cause of unwanted chirping is a dying battery. Experts recommend changing smoke alarm batteries every six months to one year. Most models take 9V or AA batteries.
According to the NFPA, battery problems were the most common cause of smoke alarm failure in home fires. When you replace the battery in one detector, replace the batteries in all detectors throughout your home at the same time.
Many smoke alarms are hardwired, with backup batteries in case of a power failure. If a wire becomes loose, the alarm will respond just as a battery-powered one will: it will beep.
You can confirm that your alarm is hardwired by removing the chirping alarm from its bracket. If there are wires, check that the termination is still firmly connected to the back of the alarm. Gently reseat the connector harness. A loose harness is one of the most common causes of hardwired smoke detector beeping.
If that does not solve your problem, or if a wire is visibly loose, contact an electrician who specializes in smoke detector repair. If you are not comfortable working with electrical connections, contact a licensed electrician. According to the CPSC, hard-wired smoke alarms should be installed by a qualified electrician.
If your detector is hardwired, it may also beep on backup power if the circuit it is wired to has lost power. Go to your breaker box and look for any breaker in a middle or off position. Flip it fully to the off position first, then back to on. Return to the detector and press the test button to confirm it has power.
For related guidance on backup power for your home, see our residential generator article.
Smoke alarms do not last forever. Newer units may come with a built-in sealed battery that cannot be replaced. These units are designed with a 10-year usable life.
Check the manufacture date printed on the back of the unit. If it is more than 10 years ago, replacement is required under NFPA 72 standards. The U.S. Fire Administration states smoke alarms should be replaced 10 years from the manufacture date, not the installation date.
If replacing the battery has not stopped the chirping, the unit has likely reached end of life and needs to be replaced.
After addressing the underlying cause, you may need to reset the unit to stop residual chirping or beeping. The reset process differs by scenario.
Scenario 1: After battery replacement
Scenario 2: After a false alarm
Scenario 3: After a hardwired power outage
Common reasons a smoke detector goes off for no reason include:
Most of us have triggered the smoke alarm while cooking. If this happens regularly, press the hush or silence button on the detector to temporarily suppress the alarm for 8 to 10 minutes while you ventilate. This is not the same as disabling the unit.
The NFPA recommends keeping smoke detectors at least 20 feet from kitchen appliances where possible. If 20 feet is not achievable, aim for at least 10 feet of separation. Use your kitchen vent and open windows to maintain airflow. Staying on top of oven cleaning also reduces false alarms since grease residue burns off and creates smoke.
For more on common kitchen appliance problems that affect your home systems, see our related guide.
Steam from hot showers can trigger photoelectric smoke detectors, especially when the detector is mounted directly outside the bathroom door. Use the bathroom vent fan during and after showers to reduce steam. Use the hush button when needed.
If your detector is mounted directly outside a bathroom door, consider relocating it at least 3 feet from the doorway. Steam-triggered false alarms are frequently a placement problem, not a detector problem.
Dust and pollen can accumulate inside the sensing chamber and trigger false alarms, especially during high-pollen seasons. According to the CPSC, vacuuming smoke alarms regularly with a soft brush attachment is a recommended maintenance step.
To clean your detector:
If you notice false alarms peaking in spring or fall, pollen is likely the culprit. Clean the unit and test it after cleaning.
Virtually any aerosolized chemical, including paint fumes, hairsprays, and powerful cleaning solutions, can trigger a smoke alarm. The CPSC specifically warns never to paint over a smoke alarm. Paint can block sensors and vents, preventing proper operation. If a unit has been accidentally painted, replace it immediately.
When using aerosols near detectors, open windows to facilitate airflow and temporarily relocate the product away from the detector.
If your smoke detector triggers false alarms regularly and none of the fixes above resolve the problem, relocation may be the actual solution.
The NFPA requires smoke alarms in every sleeping room, outside each separate sleeping area, and on every level of the home including the basement. Beyond that minimum, placement distance matters. Keep detectors at least 20 feet from kitchen appliances where possible, and at least 3 feet from bathroom doorways. Units mounted on the ceiling in a high-humidity hallway near both a bathroom and a kitchen are prone to chronic false alarms regardless of the detector’s condition.
Indicator lights communicate operating status continuously, without requiring a full alarm. Understanding what each light means lets you diagnose a problem in seconds. For more on smart home safety upgrades that complement your detector system, see our related guide.
A steady green light on a smoke detector typically means the unit has AC power and is functioning normally. A flashing green light on some models indicates standby mode. No green light at all usually signals a power interruption or a dead battery. First Alert models display a steady green light to indicate normal AC power operation.
A red blinking light, typically once every 30 to 60 seconds, indicates the unit is in normal standby mode and has power. A rapid red blinking or continuous red light indicates the alarm is actively detecting smoke or has been triggered. After an alarm event, a slow red flash confirms the unit is in post-alarm memory mode and has recently detected something.
If there is no indicator light at all, check the battery first, then check the hardwired connection, and then check the circuit breaker. If power is confirmed but no light appears, the unit may have failed internally and needs replacement.
A yellow or amber light on select models, including some First Alert and Kidde units, indicates a fault condition or a low battery warning. A solid yellow light often means a sensor fault that requires unit replacement. Consult your model’s manual to confirm the specific meaning for your unit.
Hardwired smoke detectors draw power directly from your home’s electrical system and include a backup battery for use during outages. This design makes them more reliable than battery-only units, but it also means there are more potential points of failure to check when something goes wrong.
Remove the unit from its bracket and check that the termination is still firmly connected to the back of the alarm. Gently reseat the connector harness. A loose harness is one of the most common causes of hardwired smoke detector beeping.
If the harness looks intact but the unit is still chirping, check whether the wiring pigtails inside the bracket are securely seated in their connectors. If you are not comfortable working with electrical connections, contact a licensed electrician.
If the wiring connection is secure but the unit is still not functioning, the circuit powering the detector may have tripped. Go to the breaker box, locate the tripped breaker (it will be in a middle or off position),flip it fully off and then back on, and then test the detector. See the step-by-step reset process in the beeping section above.
After a power outage, hardwired detectors sometimes continue to chirp even once power is restored. Three causes are most common:
Call a licensed electrician if:
The CPSC states that hard-wired smoke alarms should be installed by a qualified electrician.
You can likely handle it yourself if:
Worried about unexpected smoke detector repair or replacement costs? Liberty Home Guard’s home warranty plans can help cover the cost of covered system failures. See our optional coverage details to learn more.
In an interconnected system, all detectors are wired or wirelessly linked so that when one unit detects a problem, every alarm in the home sounds simultaneously. According to the NFPA, interconnected alarms improve protection because one alarm sounding triggers them all, alerting everyone in the home regardless of where the fire starts.
When all alarms trigger at once, the cause is almost always in a single initiating unit, not in the entire system.
When alarms are interconnected, the unit that initiated the alarm will typically have a faster blinking red light than the units responding to it. Walk through the home and identify the unit with the most rapid light pattern. That is the unit to inspect first.
Three beeps in a pattern typically signal smoke or fire detection. Four beeps in a pattern signal carbon monoxide. A single chirp every 30 to 60 seconds signals a low battery. Continuous beeping means the alarm is actively detecting a threat. Check your specific model’s manual to confirm the pattern.
Pattern | Meaning |
3 beeps in a repeating pattern | Smoke or fire detected |
4 beeps in a repeating pattern | Carbon monoxide detected |
1 chirp every 30 to 60 seconds | Low battery |
Continuous beeping | Active emergency: evacuate |
3 beeps, pause, 3 beeps (on some models) | Unit malfunction or end of life |
Combination smoke and carbon monoxide detectors use groupings of three beeps to signal smoke and four beeps in a row to signal CO. This distinction is critical. If you cannot immediately identify whether an alarm is signaling smoke or CO, treat it as an emergency and evacuate first.
If you are weighing home appliance repair costs against replacement across multiple home systems, a home warranty can simplify the decision.
Turn the unit over and look for a label on the back. The manufacture date is printed there. If the label is missing or illegible, replace the unit. You should not use a smoke detector without a confirmed manufacture date.
The U.S. Fire Administration states that smoke alarms should be replaced 10 years from the manufacture date, not the installation date. Under NFPA 72, this 10-year replacement standard is the recognized benchmark.
According to NIST, approximately 20% of homes with smoke alarms have non-operational units. Working smoke alarms could reduce U.S. residential fire deaths by 36%, saving an estimated 1,100 lives per year.
If replacement costs are a concern, consider exploring smoke detector home warranty coverage. Liberty Home Guard offers optional coverage for smoke detectors, which means a replacement that would otherwise come out of pocket may be covered under your plan.
For additional guidance on common home system failures and when repair crosses into replacement territory, see our related resources.
The USFA recommends testing all smoke alarms at least once a month and replacing batteries at least once a year for 9-volt battery-powered units.
If your smoke detector fails the monthly test even after a fresh battery is installed, do not attempt to repair the internal sensor or components. Smoke detector sensors degrade over time and cannot be restored through cleaning alone.
Replace the unit immediately. According to the CPSC, if the test button does not sound the alarm, replace the unit.
Most smoke detector problems, from chirping to false alarms to hardwired failures, have straightforward solutions. Replace the battery. Clean the chamber. Reseat the wiring harness. Reset the circuit. When those steps do not resolve the problem, the unit has likely reached the end of its useful life and needs replacement, not repair.
To summarize: fix it yourself when the issue is a battery, dust, placement, or a loose connection. Call a licensed electrician when wiring is involved beyond a simple harness swap. Replace the unit when it is over 10 years old, fails a monthly test, or has physical damage.
For cost protection when repair or replacement is unavoidable, explore smoke detector home warranty coverage from Liberty Home Guard. And for broader guidance on keeping your home systems running safely.
There’s a reason Liberty Home Guard was rated the #1 Home Warranty
Service by U.S. News and World Report for 2021, 2022, 2023, 2024, and 2026. Check out our services.
Most smoke detector problems can be fixed without replacement. Battery replacement resolves the majority of chirping issues. Cleaning removes false-alarm-causing dust. Wiring checks fix hardwired unit failures. Replacement is only necessary when the unit fails testing, has a sealed dead battery, or is 10 or more years old.
If you are replacing a hardwired unit with a compatible model using the existing wiring harness, most homeowners can complete the swap without an electrician. If you are installing new wiring, adding to an interconnected system, or working with unfamiliar electrical connections, the CPSC recommends using a qualified electrician.
Steam from hot showers can trigger photoelectric smoke detectors, especially when the detector is mounted directly outside the bathroom door. Improve bathroom ventilation, use the detector's hush button to silence the alarm temporarily, and consider relocating the detector at least 3 feet from the bathroom doorway.
Replace smoke detectors 10 years from the manufacture date printed on the back of the unit, per NFPA 72 and USFA guidelines. Replace sooner if the unit fails a monthly test even after a fresh battery is installed.
A slow red blink, typically once every 30 to 60 seconds, indicates the detector is in normal standby mode and functioning properly. A rapid red blink or continuous red light indicates an active alarm event. After an alarm, a slow red flash confirms the unit is in post-alarm memory mode and has recently detected something.
In an interconnected system, all alarms trigger when one unit detects a problem. Look for the unit with the fastest blinking red light to identify the initiating alarm. Common causes are dust buildup, a dying battery, a false alarm trigger from steam or cooking smoke, or a failing unit. Follow the 5-step isolation process in this guide to diagnose and resolve the issue.
Stay Ahead of Potential
Home Mishaps!
Subscribe to our Liberty Home Guard Newsletter and gain access to exclusive content that ensures your peace of mind.

Subscribe to receive our emails & get
Have questions?
Call us: (833) 544-8273
